Wednesday, September 17, 2008

[Image] An Ensign still flies on Ladybird

3rd September, 1941. Tobruk Harbour, Libya.

The final resting place of HMS Ladybird.

Down but not out, a battered naval ensign still flies on the mast of HMS Ladybird as she rests stricken on the floor of Tobruk Harbour. Destroyed by dive bombers she was put to work as an anti-aircraft platform to destroy the very planes that sunk her.

HMS Ladybird was an insect class gunboat of the Royal Navy built in 1916 initially for patrol work along the River Danube during World War One. It was involved in the Panay incident in 1937 where Japanese artillery fired upon her near China. Posted to Singapore it was stripped down and towed to the Mediterranean in 1940.

Damaged sustained en route limited the Ladybird's speed to 7 kilometres per hour due to her misaligned hull. Stationed at Port Said in Egypt in a protective role it was utilised in one failed attack on an Italian island by a group of Royal Marines that saw it hit with an aerial bomb and severely damaged. Repaired it was then pressed into work as a part of the "Tobruk Ferry", the vital naval supply convoy that would restock Tobruk under cover of darkness with everything from reinforcements to ammunition, food and medical supplies. Tanks were even delivered to the garrison during the siege by the "Ferry".

It was during one such resupply operation on 12th May, 1941 that Ladybird was hit by dive bombers and set on fire. Settling on an even keel in 10 feet of water Ladybird's 3 inch guns were still functional and above the water line. Morshead immediately put the wreck and the deck guns to work as a static anti-aircraft platform. Men were stationed aboard the wreck to man the guns and even set up living quarters inside the wrecked hull.

Ladybird was damaged by aerial bombs and shrapnel many times during the siege but the men stationed aboard took down more than their fair share of Stukas by way of compensation.

images 020572 and 020569 Australian War Memorial.


A 3 inch Deck gun on Ladybird.

[Image] Off for a quick dip

June, 1941. Tobruk, Libya.

VX48227 Pvt. C.T. Jury at Cleopatra's Bath.

Pvt. Charles T. Jury of HQ 26th Brigade prepares to have a swim in what locals called "Cleopatra's Bath", supposedly a site favoured by the former Egyptian ruler for swimming.

This natural rock bath on the coast east of Tobruk was near the location of the 26th Brigade's HQ Company. It was said that the Pharaoh Cleopatra would swim in this rock pool and considered it one of her favourites. There are many sites along the North African coast that claim to be Cleopatra's Bath so to what extent this claim lies in truth is unknown. I hardly think that Pvt. Jury cares if the story is true or not. He is likely more concerned about getting as clean as possible.

image 020132 Australian War Memorial.

Sunday, September 14, 2008

[Image] Stuka attack on the 2/24th.

30th April, 1941. Tobruk, Libya.

Stuka's bomb the 2/24th in the Red Line.

This amazing photo was taken from within a Carrier of the 2/48th Infantry Battalion as they approached the Red Line to offer assistance to the entrenched 2/24th. This attack was the second major thrust made by Rommel during the Siege and was heavily supported by artillery, tanks and infantry. The ever present Luftwaffe added the icing to the cake presented to the Diggers by their relentless dive bombing of the Red Line positions.

The Luftwaffe's aerial bombing was an attempt to demoralise the Australians and more importantly keep them underground in their Red Line posts whilst tanks and supporting infantry moved up to favourable positions in front of the anti-tank ditch.

This battle signalled the beginning of a period of bloody fighting that developed into the Battle of the Salient. This was one of the most trying and costly actions of the entire defense of Tobruk, for both sides.

The Carrier in the above photo has a Boys Anti-Tank Gun mounted in the forward gun position, the barrel of which can be seen protruding from the front of the photo. Also other tracks can be seen in the desert surface in front of the Carrier's direction of travel. These are most likely tracks from other Australian Carriers as opposed to Axis Tank tracks. The Axis tanks were a this stage of the battle concentrated to the front of the Red Line and not further back where this photo was taken.

No men were killed by the Stuka's bombs this day but on the day after this photo was taken 32 men from the 2/24th Infantry Battalion were killed in action in the Red Line.

image 128989 Australian War Memorial.

[Image] The Fig Tree R.A.P.

30th September, 1941. Tobruk, Libya.

A wounded man arrives at the 'Fig Tree'.

This wounded Digger from the 2/17th Infantry Battalion is being carried into the mouth of the cave under the 'Fig Tree' Regimental Aid Post. Located just inside the Red Line, north of the Derna Road, the Fig Tree was the only feature in an otherwise barren desert. It was visible from both Hill 209 in the Salient and Carrier Hill behind that. As a result it was an easy target for the German Artillery and would be heavily shelled for several hours per day.

During the shelling men would be stuck underground in the cramped dirty conditions until it was safe to leave. It was a place to stabilise wounded before transferring them to the Australian General Hospital near the Harbour. It patched up the walking wounded and sent them back to the lines.

To this day the Fig Tree still stands in Tobruk.


The Entry from the inside.

Waiting in the cave for the shelling to stop.

images 021023, 021021 and 021026 Australian War Memorial.

Saturday, September 13, 2008

[Image] Unrewarded 2/13th Valour

14th February, 1941. The Middle East.

NX14879 Cpl. J.T. Willis enjoys a quiet beer.

NX14879 Cpl. James Thomas Willis of the 2/13th Infantry Battalion enjoys a quiet beer somewhere in the Middle East prior to engaging in the action during the Benghazi Handicap that ultimately took his life.

A farm hand from Moree, north western NSW, Cpl. Thomas was in charge of a Bren Gun section that was posted near the road at the bottom of the pass at Er Reijima when they were surprised by the rapid advance of the German Panzer Tanks. Finding themselves suddenly under intense fire Cpl. Willis grabbed a Bren Gun and yelled at his men to withdraw whilst laying down a barrage of machine gun fire on the advancing Germans from a formation of rocks. This drew the fire of the tanks killing Cpl. Willis but his sacrifice did allow some of his men to escape, though unfortunately not all.

Cpl. Willis' unfaltering leadership and decisive action under fire undoubtedly saved the lives of some of his men that day but he has never been acknowledged by the Army with the posthumous awarding of any medal for valour under enemy fire.

I personally believe that Cpl. Willis met the criteria for the award of the Military Medal.

"On the 4th April, 1941 when under intense fire from German tanks and infantry he single handedly and without due regard for his personal safety did take charge of a Bren Light Machine Gun and whilst ordering his men to withdraw to safety lay down a barrage of covering fire to safeguard the retreat of his men and to draw the fire of the enemy onto himself, an action that he most certainly knew would likely result in his death."

"Whist Cpl. Willis' section did suffer casualties in the engagement his utmost attention to duty and to the safety of his men ensured that there were survivors. This would undoubtedly not have been the case if Cpl. Willis had not sacrificed his own life by drawing the enemy fire onto himself and thus away from his men."

Sounds like a citation for a Military Medal to me. You be the judge. Feel free to post your comments. I am eager to hear what you may think.

Cpl. James Thomas Willis is memorialised on the Roll of Honour here;


image p05238.001 Australian War Memorial.

[Image] United we Stand!

22nd October, 1941. Tobruk, Libya.

The Men of Five Nations.

During the Siege of Tobruk the Men of 5 Nations were all that stood between Rommel and the Middle Eastern oil fields. Holding out at Tobruk, under siege by the German Afrika Korps and the Italian Army, these men made the German High Command commit far more troops and supplies to the maintenance of the siege than they were comfortable with, far weakening the Axis thrust into Egypt. It also denied Rommel the means of transporting the immense amount of supplies needed to wage a desert war via ship.

Everything the Axis used had to be transported by land across the desert from Tripoli, over a 1,000 miles away. Holding out for the 8 months that they did allowed the Allies to conclude negotiations with the United States for the supply of war materials that would ultimately arrive in time for the Battle of El Alamein in October, 1942.

The men that held the Axis at Tobruk, the only men entitled to be called 'Rats of Tobruk' came from (from left to right) Poland, Britain, India, Australia and Czechoslovakia.

Whilst this blogs primary focus is on the Australian 9th Division's contribution to the war effort the author acknowledges the sacrifice made by the men of all of these nations and I will endeavour to feature them when I have suitable material and a bit more time.

images 041852 and 041853 Australian War Memorial.


Saturday, September 6, 2008

[Image] The last men standing at Tobruk

December, 1941. Tobruk, Libya.

The last Australians out of Tobruk.

These four men of the 2/13th Infantry Battalion were the last Australians to leave Tobruk. Legendary photographer, Damien Parer, took this shot of the men enjoying a meal. The 2/13th was the only Australian unit to see the Siege of Tobruk through in it's entirety after the Destroyer that was meant to evacuate them in October was sunk 60 miles short of Tobruk.

Not being able to be evacuated by sea the 2/13th fought their way out in the breakout that linked up with the 8th Army and were transported back to Alexandria by truck. Many men were killed and wounded in the breakout action but this was a major success that enabled the Battalion to be finally relieved.

The men in this photo, as taken by Parer, are;

NX36776 Pvt. Leslie E. Everett of Hay, NSW.
NX35738 L. Cpl. Alexander O'Connor of Wagga Wagga, NSW.
NX36799 Cpl. Gabriel Richardson of Yenda, NSW.
NX35348 L. Cpl John W. Cox of Grong Grong, NSW.

All these men survived the war to return home. The sense of relief on their faces belies the fact that worse is yet to come at Alamein in 1942.

image 010979 Australian War Memorial. Negative by Damien Parer.

[Image] Ack Ack Away!

9th October, 1941. Tobruk, Libya.

3.7 inch Anti-Aircraft fire at night.

This amazing photo looks almost like a surreal model. Taken at night, without a flash, using only the illumination of the firing guns. The huge muzzle flashes light the area around for a large area. This means that the gun has to keep firing constantly to ensure that enemy aircraft can't get close enough to get an accurate shot away.

image 020906 Australian War Memorial.

[Image] 2/13th goes through the wire at R27.

8th September, 1941. Tobruk, Libya.

Men of the 2/13th go through the wire.

These two men of the 2/13th are preparing to go through the wire on a small patrol out from post R27 in the Red Line. On the left holding Lee-Enfield .303 rifle with fixed bayonet is NX36511 Sgt. William F. Kubank. To his right is NX36399 Pvt. Stanley C. Hutton with the Thompson submachinegun.

Post R27 in the Red Line is opposite the El-Adem Escarpment, behind which camped the Afrika Korps. The low ground in front of the escarpment was covered extensively by German machine gun posts but these were regularly monitored and dealt with by nocturnal patrols into no-man's land.

image 020784 Australian War Memorial.

[Image] Departing Diggers leave their mark.

20th September, 1941. Tobruk, Libya.

Soon to depart troops leave their mark.

Having been notified that they were to be relieved soon these Diggers decided to leave their marks on a former cafe in Tobruk.

Pictured from left to right are;

SX8509 Pvt. Archibald Lawrence Boyes of the 2/48th.

SX5207 Pvt. Torrence Ford Egan of the 2/48th.

VX40954 Pvt. William Neil Morris of the 2/48th. Pvt. Morris is having a joke by painting his name as "Ned Kelly".

All three men survived the war, especially the carnage of Alamein that was so devastating to the 2/48th Infantry Battalion.

image 020629 Australian War Memorial.

[Image] Relieved Rats arrive in Alex

27th September, 1941. Alexandria, Egypt.

Relieved at last!

These 9th Division veterans of Tobruk manage a smile as they arrive via "bomb alley" to the safety of Alexandria, Egypt. Many of these first men to arrive were wounded and were amongst the priority evacuees.

Evacuated at night by destroyers of the Royal Navy and the Royal Australian Navy these ships would arrive on moonless nights and arrive, unload and take on passengers and cargo and then depart all within the space of half an hour. Once free of the harbour the next 60 miles of coastline was known as "bomb alley" as it was the last stretch of water before Egypt in range of Luftwaffe planes. Zigzagging at high speed to avoid bombers and to break up their wakes these ships were the lifeline of Tobruk Garrison. Everything coming into and going out of Tobruk during the siege travelled via this method.

Whilst the men in this photo have been individually numbered for identification purposes the notation with their names that accompanied it has long since been lost.

image 020470 Australian War Memorial.

[Image] An Incredible Escape Vol. 2

August, 1941. Tobruk, Libya.

A 1,000 pound dud.

These four men of the 9th Division owe their lives to the Czechoslovakian resistance, many members of whom secretly work in Nazi Munitions plants in their occupied country against their will.

This 1,000 pound bomb (453.5 kilograms) contained huge amounts of high explosives but without their detonators they were inert weights. This particular bomb landed 20 feet from the anti-aircraft gun manned by the above Diggers. Amazed to still be alive the men inspected the dud after the attack and found in labeled "Made in Czechoslovakia" in non official markings.

This was not the only dud from Czechoslovakia to arrive at Tobruk during the siege. One memorable one, another 1,000 pounder landed in the town square and failed to detonate. When Engineers arrived to disarm it so it could be removed an examination of where the detonator should have been found a crumpled piece of paper with a handwritten note saying simply;

"From your friends in Czechoslovakia. I am sorry but this is all we can do to help right now".

image 009520 Australian War Memorial.

[Image] Tracers at Twilight.

August, 1941. Tobruk Libya.

9th Division Bren Gunner opens fire at dusk.

With the glow of their illumination lighting their flight path these tracer bullets leave a visible sign of their passage at night as they rapidly pepper the German lines a mere 400 yards away.

This photo was taken during a fierce exchange of machine gun fire between the Aussies and the Germans on the Red Line. Twilight was a preferred time for attacks and counter-attacks as the dying light reduced the effectiveness of both machine guns and artillery. Tracer rounds assisted gunners in aiming their fire at night as they could see the path of their bullets. Problem is so could everyone else.

image 009492/14 Australian War Memorial.

[Image] An Incredible Escape

22nd April, 1941. Tobruk, Libya.

The Benghazi Handicap's Wooden Spooners.

Meet two of the 9th Division's luckiest men. QX1698 Sapper Stanley Curtis and QX2454 Sapper Edward Hetherington-Harford of the 2/7th Field Company, Royal Australian Engineers enjoy a well received cigarette after their late arrival in Tobruk on foot after a 16 day trek.

Left behind in Benghazi to plant demolitions on Italian supply dumps so that the advancing Afrika Korps could not take advantage of them the two Sappers planted explosives to cover the 9th Divisions retreat, known as "the Benghazi Handicap". When surprised by the rapid approach of the advancing Afrika Korp the two men hid and were overtaken by Rommel's Panzer Divisions.

Finding themselves behind enemy lines and surrounded by thousands of Axis troops the men hid by day and travelled by night where possible overland on foot. After a journey of 16 days, and 300 miles (483 kilometres), the men managed to sneak past German positions surrounding Tobruk and return to their units. Immediately hospitalised for treatment of their injuries it is not known if the men played any further part in the Western Desert Campaign. If so I believe they well deserved any rest coming to them after that.

image 041710 Australian War Memorial.

[Image] A Rat in a Hole Vol 2.

September, 1941. Tobruk, Libya.

A very creative doover.

This soldier of the 2/23rd Infantry Battalion takes shelter from the blistering sun of the Libyan desert in his doover improvised by hanging a hammock between the rocks of a sangar built on the side of a small rise.

In the shade, yet open to the breeze on one side the hammock would allow the air to circulate around the Digger and keep him as cool as possible in the situation.

image 020493 Australian War Memorial.

[Image] Rare reprieve for 2/23rd Captain.

June, 1941. Tobruk, Libya.

VX15648 Capt. Edwin P. Tivey takes a rare break.

Capt. Ed Tivey of the 2/23rd Battalion takes a moment of quiet reflection to smoke a cigarette inside the dugout of the Headquarters of the 26th Brigade.

With conditions for officers at HQ areas better than those of the men at the front lines they were hardly luxurious. Often the positions of the HQ areas were plotted by German spotter planes and relayed to the artillery who then would launch a barrage of shells onto the locations. More than one HQ was destroyed by direct hits by the German artillery during the Western Desert Campaign.

Capt. Tivey would have been responsible for 4 platoons of infantry totalling 129 men. It is no wonder that a quiet cigarette in the solitude of his dugout would be a welcome relief from the pressures of command.

Unfortunately research into Capt. Tivey has revealed that he died from illness in Italy on 26th March, 1943. At the time of his death in an Italian POW camp, then promoted Major Tivey was 34 years old. As his service record is yet to be digitised by the National Archives I am unable to ascertain the circumstance behind his capture and transfer to Italy.

Major Edwin Peter Tivey is memorialised at the Roll of Honour here http://www.awm.gov.au/roh/person.asp?p=147-23753

image 020151 Australian War Memorial.

[Image] "The Seat of the Army"

September, 1941. Tobruk, Libya.

The AIF Field Latrine.

This 9th Division Corporal shows off the type of field latrine used by Australian troop in front line positions at Tobruk. With typical Australian humour it was nicknamed "The seat of the Army".

Designed for use on the sandier parts of the desert, the digger would take a small shovel and dig a hole and place the "seat" over it and complete his task. Careful choice of your boghole's position was necessary to avoid detection by snipers and air attack.

image 021003 Australian War Memorial.

[Image] Wounded 2/23rd patrol returns

17th September, 1941. Tobruk, Libya.

2/23rd Patrol returns through the wire.

This patrol from the 2/23rd Battalion returns through a gap in the wire in their Red Line posts. At this time the 2/23rd had just relieved the 2/48th the night before in their positions on the Western salient.

This seven man patrol returns with two wounded. One carried on a collapsible stretcher the other with a bandaged thigh wound is carried by a mate piggy back style. Casualties in this part of Tobruk were high.

image 020669 Australian War Memorial.

[Image] The Water Rat of Tobruk

25th September, 1941. Tobruk, Libya.

Gelignite fishing in the harbour.

This soldier of the 9th Division, identified only as Bill Woodhouse of Wynnum, Queensland, is fed up with the constant rations of bully beef and biscuits and looks to supplement his and his mates rations with a few fish fresh from the Mediterranean caught by throwing sticks of Gelignite into the harbour. The ensuing explosion causing a shock wave in the water that kills the fish allowing them to rise to the surface to be collected by the hungry Diggers.

The fish provided the men with much needed variety of fresh protein that the army rations lacked. It was also a much needed stress relief to have a swim in the ocean.

images 020635 and 020636 Australian War Memorial.

Catch of the day, Tobruk style.

[Image] RAAF foils a Red Line Raid

1941. Tobruk, Libya.

Red Line positions get strafed.

A German Luftwaffe Messerschmitt BF109 Fighter strafes 9th Division front line posts with it's three mounted machine guns raising up clouds of dust and sand as the bullets impact the ground.

Little did this pilot know that his actions were noticed by one of the few Australian RAAF pilots who were still operational in the area who dropped in on him and shot him from the sky to the cheers and applause of the infantry in the Red Line.

I think the above photo is amazing in that it is evidence of the low altitude that the German pilots would drop to in order to have a final parting shot at the entrenched infantry. I have read accounts from members of the 2/17th Infantry Battalion that stated that they were often strafed by fast low flying German's at altitudes as low as 100 feet (approximately 30 metres for the metrically inclined).

They would often have a last parting shot at the infantry after supporting dive bombers on their attack run over the harbour and then follow the El Adem road to the safety of the escarpment and the German lines. If damaged these planes would make an all out last ditch effort to put down beyond the Red Line. Some made it, some didn't. Often the same pilots would strafe the same positions at the same time each day and would make 4 or 5 passes then tip their wings and wave at their intended targets before escaping for another try.

This one was unfortunately caught short by a rare allied fighter. The Luftwaffe certainly had unprecedented air superiority in the Western Desert in 1941. One wonders with 10 German fighters for ever 1 Allied one (at best) if some Luftwaffe pilots would be a little overconfident about their chances.


One less Messerschmitt to worry about.

images 010852 and 010843 Australian War Memorial.

[Image] The long walk to the cage

April, 1941. Tobruk, Libya.

2/48th Captures 70 Italian POW's.

A lone Digger of the 2/48th Infantry Battalion leads a column of Italian POW's on the long walk back from the front lines to the Prisoner of War cage. This was a march of approximately 10 kilometres. With shouldered Lee-Enfield .303 and fixed bayonet he leads the prisoners past the HQ of the 26th Brigade.

It was because of the Italian's general reluctance to fight, and the fact that they felt they would be treated better by the Australians than the Germans, that they willingly surrendered in large numbers. Many captured Italian soldiers possessed a white silk handkerchief and were not afraid to use it. Italian soldiers would often withstand sustained small arms fire from a distance but would crack at the sight of the fixed bayonet up close. Even many of the Afrika Korps chose to spend the rest of the war as a POW than fall victim to an Aussie bayonet. Making this choice is not an act of cowardice.

Many of these Italian prisoners were sent back to Australia and sent to work on farms in rural areas, often later immigrating back after the war to purchase their own farms.

image p02242.018 Australian War Memorial.

Friday, September 5, 2008

[Image] One less Italian bomber over Tobruk

June, 1941. Tobruk, Libya.

A fiery end to an Italian air raid.

This Italian bomber met with a fiery end after attempting to bomb Australian positions at Tobruk. Relatively structurally intact, this suggests that the plane managed to make a forced landing but was consumed by fire whilst grounded.

Whether destroyed by fire, or Australian scroungers, there is very little left that is salvageable on this plane. Note the completely featureless landscape behind the wreck.

Image 020071 Australian War Memorial.

[Image] Wrong Place, Wrong Time.

19th October, 1942. Tel el Eisa, Egypt.

Wreckage of German supply convoy.

During the last intense days of fighting at Tel el Eisa this German supply convoy arrived with much needed food, water and ammunition. Whilst attempting to deliver the supplies to their intended destination the course of the battle changed and they found themselves behind 8th Army lines. For some hours the battle raged back and forth with ownership of the supplies changing hands twice between British and German troops with the Germans eventually retaining their prize.

Being frantically directed away from the battle to the new supply delivery point by German Intelligence the convoy arrived to find that they had been mistakenly directed into the 9th Division's front lines.

The Germans went hungry that night.

image 013463 Australian War Memorial.

[Image] A Rat in a Hole

August, 1941. Tobruk, Libya.

A Rat in a Red Line hole.

Pvt. J. Collins escapes from German shelling in his doover. Pvt. Collins has been able to scrounge wood and metal to brace the walls and roof of his hole in the ground. Men spent incredible lengths of time laying about in holes just like these. It was not uncommon to have to lie in your slit trench all day in blistering heat with little water, having to relieve yourself in a old fruit tin, any movement above the surface would draw the fire of the Germans.

Pvt. Collins has letters from home in the rafters of his shelter. This is obviously a more long term doover, as one would construct during an extended period in the front lines. This photo was taken during a German artillery attack on Red Line positions. This would keep the Diggers underground for extended periods in cramped, hot and dusty conditions. Depending on the time of the shelling men in the Red Line ran the risk of missing out on their one hot meal a day if the rations trucks were attacked.

image 009513 Australian War Memorial.

I have been unable to positively identify Pvt. J Collins as there were 217 men with that name that served in the Army during WW2. If time permits in the future I will attempt to make a positive identification.

Tuesday, September 2, 2008

[Image] "Soldato Australiano Sconosciuto"

December, 1941. Tobruk, Libya.

"Unknown Australian Soldier".

This moving shot, by legendary war photographer Damien Parer, was taken at an Italian War Cemetery just outside of Tobruk. Amongst the Italian graves Parer found a sole grave with a simple yet dignified wooden cross with the inscription "soldato australiano sconosciuto".

The Western Desert is still disclosing secrets from World War Two. In April, 2008, renowned Western Desert Battlefield tour guide Steve Hamilton located 30 graves from members of the Afrika Korps that the German government has admitted to "not knowing about".

image 010989 Australian War Memorial. Negative by Damien Parer.

Monday, September 1, 2008

[Image] Bored Engineers are trouble

22nd September, 1941. Tobruk, Libya.

9th Division Engineers improvise a flamethrower.

This Sapper from the 9th Division's Royal Australian Engineers demonstrates a method of improvised flame throwing. In a used 44 Gallon drum he mixes a potion of 60% Benzol and 40% Petrol. Into the mix was thrown a handful of metal shavings.

When ignited by remote device this drum exploded with an immense curtain of liquid flame that would be devastating to exposed infantry. I particularly like the silhouette of the slouch hat in the explosion in the bottom photo.

images 020665 and 020666 Australian War Memorial.


[Image] The barbed wire clothesline

25th September, 1941. Tobruk, Libya.

A rare opportunity to get clean.

For these men of the 9th Division a rare trip to the incredible white beaches of the Mediterranean is not only leisure, but necessary for bathing. With strict water rationing in effect a soldier's water ration was best used for drinking leaving little for personal hygiene.

The crystal clear salt water of the Mediterranean not only refreshed the troops but doubled as a form of antiseptic, with the salt water immersion aiding in the healing of wounds and desert sores. It was also a welcomed opportunity to wash your very soiled clothes.

It was an unwritten law of the Siege of Tobruk that troops resting at the beaches were not to be fired upon. It was not uncommon for a group of Diggers taking a rest spell on a beach at Tobruk to see Afrika Korp's troops swimming carefree a few miles down the beach.

image 020618 Australian War Memorial.

[Image] Tommy got you covered

1st September, 1941. Tobruk, Libya.

VX31704 Cpl. Warwick Brownrigg & his Thompson.

VX31704 Cpl. W. Brownrigg aims his American made Thompson sub machine gun out a firing slot in the sandbag defences of his position in the Red Line of Tobruk's outer perimeter.

Cpl. Brownrigg, of the 2/23rd Infantry Battalion out of Victoria, featured in a number of photos taken at the time by members of the Military History and Information Unit. In this one he has a rare Tommy Gun with a larger 50 round drum magazine inserted. It also has the fore grip fitted, which with the added weight of the larger magazine made it a necessity for semi-accurate firing.

Cpl. Brownrigg is listed as having been discharged from the Army on 22nd October, 1942. As his service record has not been digitised by the National Archives I am unable to say for certain why. I suspect that his discharge date being so close to the date of the Second Battle of El Alamein that he may have been so severely wounded that he was not expected to be able to return to service and thus discharged. At this stage this is nothing more than an educated guess.

image 020503 Australian War Memorial.

[Image] 25 Pounder at the Australian War Memorial

August, 2008. Australian War Memorial

The 25 Pounder Heavy Field Gun.

A British 25 Pounder Heavy Artillery piece is as returned from service with the 9th Division in the Western Desert Campaign. This actual gun was used during the Battle of El Alamein in the attack that stopped Rommel's final drive across North Africa and is on public display at the Australian War Memorial at Canberra, Australia.

It sits on a heavy steel base plate that acts as a means with which to anchor and turn the gun on uneven ground, like the sand or rock of the Western Desert. It fires the standard commonwealth High Explosive charge but was also capable of firing Armour Piercing, Chemical, Smoke and Flare rounds. This gun is said by many to be the best artillery piece of the Second World War, though there are just as many supporters of the German 88mm.

The 25 Pounder was the standard artillery piece of both the Royal Australian Artillery as well as the Royal Horse Artillery, the British Artillery Regiment, that aided the Australian Infantry with the defence of Tobruk during the siege by the Afrika Korps in 1941.

Several of these guns, along with countless crates of ammunition, were captured by the Germans at Mersa Matruh in Rommel's rapid advance towards Alexandria in 1942. These same guns were turned upon the 2/48th Infantry Battalion during the Battle of El Alamein with devastating effect. The 2/48th retook the guns within a short period of time and again set them upon the fleeing Germans.

All accounts from Tobruk that I have read all say that without the support of the Royal Horse Artillery the Siege of Tobruk would have been over very quickly. Tobruk was the perfect example of Australian Infantry and British Cavalry and Artillery working as one cohesive unit.

image courtesy of Robert Snewin. Used with permission.

This post is a direct reponse to the question asked by Douglas Chan who wanted to know what were the Royal Horse Artillery guns used during the Siege of Tobruk. I hope this helps Douglas. Good luck with your project!

[Image] German Vanity at Alamein

September, 1942. El Alamein, Egypt.

The Swastika flags bound for conquered Alexandria.

These unidentified men of the Australian 9th Division enjoy hunting for German souvenirs amongst the vehicles that they destroyed in a recent advance. It was said that Rommel was so confident on taking Alexandria with his last push that he was ordered by High Command in Berlin to ensure that all vehicles carried adequate supplies of swastika flags so that the victorious Afrika Korps could enter Alexandria under full colours.

In reality they made really cool souvenirs for Aussies to take home to show their friends and family alike. With the ample amount of them carried there were very many less disappointed Diggers after Alamein than before.

images 042008 and 042009 Australian War Memorial.

[Image] Anzac Day 2008, Tobruk, Libya.

April 25th, 2008, Tobruk, Libya.

An impromptu dawn service at Tobruk.

On a cold, windy Libyan April morning a small group of expat Australians and a few English gather at the Australian Memorial at the Tobruk War Cemetery. With no official consular representation or organised service these dedicated few gathered together to say a few words in memorial to the Rats of Tobruk that never came home to taste the glory of a proud nation.

I find it extremely sad that there was no official Australian Government representative at Tobruk on Anzac Day. It seems that it is up to a few of us to remind the world of the extreme sacrifice undertaken by them on our behalf.

It is my sincere hope to be there at Tobruk on Anzac Day, 2011 for the 70th Anniversary memorial. If the Australian government wont see fit to appropriately honour these men then I will do it myself, by any means possible.

image news.ninemsn.com.au

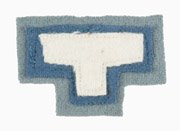
[Image] 20th Brigade Colour Patches

2/13th Infantry Battalion
New South Wales.

2/15th Infantry Battalion
Queensland.

2/17th Infantry Battalion
New South Wales.

These are the felt colour patches worn by the members of the 20th Brigade of the 9th Australian Division. The felt colour patch is worn on the upper outer sleeve of the tunic on both the left and right arms. They differ from other patches that were worn by other members of the AIF in the Second World War in that they are shaped like the letter 'T' whereas members of the 6th, 7th (except the 18th Brigade) and 8th Divisions wore a patch in the shape of a diamond separated into a top half colour and a bottom half colour.

The significance of the colour patches as worn by the 9th Division and members of the 18th Brigade of the 7th Division is that the shape has been varied from the AIF standard diamond to that of the letter 'T' in tribute to the Battalion's involvement in the defence of Tobruk. It was a badge that the Rat's wore with pride. When on leave everyone knew they were the one's who stopped Rommel in his tracks for so long.

The grey outline signifies the 9th Australian Division, the green border belongs to the 20th Brigade and the 'T' shape is in the individual battalion colours, the 2/13th was black, the 2/15th was purple and the 2/17th was white.

The changing of the colour patch's shapes, in recognition of the men involved in the Siege of Tobruk, has only ever been done this once in the entire history of the AIF.

This is one of the best indications of the significance of the action that the 9th Division was involved in at Tobruk was not lost on the Army. The Army changed nothing in recognition of deeds performed during World War One. This to me is one of the highest honours that the Army ever placed on the 9th Division.

colour patch images General Collection Australian War Memorial.

Friday, August 29, 2008

[Quote] Lt. Tas Gill, 2/48th Battalion

1st June, 1941. Tobruk, Libya.

Lt. Tas Gill, 2/48th Battalion.

Lt. Tas Gill of the 2/48th Battalion pictured above at the extreme right with mates in Palestine in 1941 had this to say about conditions at Tobruk;

"Today has been distressingly hot, about 115 I should think. Consider your plight for a moment - living in shallow holes in rocky ground, not a tree with[in] hundreds of miles, no shade except what we make with bits of wood and so on, none of the luxuries of life such as eats and drinks, and nowhere to go and no respite."

For those of you who like me live in a metric world, 115 degrees Fahrenheit is 46.1 degrees Celsius. That is hot.

image p00237.042 Australian War Memorial.

Wednesday, August 27, 2008

[Image] The Price of Victory

27th January, 1943. El Alamein, Egypt.

The wrecks of allied tanks from Alamein.

These allied tanks, knocked out by Axis forces during the Battle of El Alamein, await transport to allied workshops for repair and refit. With a desperate need for all armoured vehicles to be serviceable and with production of new units unable to meet demand, it was a logical choice to repair these tanks.

In the foreground is the US built M4 Sherman Medium Tank. This was the tank that broke the Africa Korps. Supplied under the Lend-Lease Act where America supplied war materials to the Allies in return for military base rights in allied colonies around the world. The agreement also called for the return or destruction of all war materials after the war but with nearly a billion pounds of equipment enroute when the war ended which was vitally needed by the British it was decided by the Americans to sell it at 10 cents in the dollar.

The Americans allowed the British to pay off the money owed in 50 annual installments even allowing the British to defer payments when foreign exchange rates were not favourable to them. In essence it was a deal too good to be true. Over the years the British Government elected to defer payments on 6 occasions. The final payment was made to the US Government in 2006.

image 014269 Australian War Memorial.

[Image] 9th Div Salvage Unit under fire

5th October, 1942. El Alamein, Egypt.

9th Div Salvage Unit under fire.

Being shot at is all in a days work for members of the 9th Division Salvage Unit in the desert at Alamein. These men were working to recover a disabled Bren Carrier in the forward line areas when a German shell landed dangerously close.

Whilst some men have wisely gone to ground, some merely crouch. The Salvage Unit often worked extremely close to enemy lines and were often shelled or fired upon whilst conducting their vital work. With limited access to rapid resupply of lost heavy vehicles it was often in the best interests of the 9th Division to salvage what they could and repair it for further use. Anything that could be salvaged was, even enemy equipment and hardware was pressed into service against the Axis forces at Alamein.

image 013351 Australian War Memorial.

[Image] Death of a Valentine

17th July, 1942. El Alamein, Egypt.

German shrapnel defeats the Allied Valentine Tank.

In a perfect example of why the allies needed heavier tank armour in the Western Desert this Valentine II Infantry tank has been disabled by shrapnel from German shelling. If shrapnel can be so devastating against an armoured target like this, it is horrifying to think of it's effect on infantry in the open ground of the Western Desert. This is a major reason casualties were so high at Alamein.

image 024552 Australian War Memorial.

[Image] Take that Germany!

5th October, 1942. El Alamein, Egypt.

9th Div troops mock Hitler.

These unidentified troops of the 9th Division skylark on a destroyed Mercedes Benz Battle Wagon in a mock salute to Hitler. It was common practice for many Australian troops to skylark in photos wearing pieces of captured German uniforms. A particular favourite, as worn by most of the Diggers in the above photo, is the German M35 Steel Helmet.

image 013356 Australian War Memorial.

[Image] The Western Desert Today

The Western Desert still has secrets.

This amazing image was taken by a tour guide in the Western Desert upon discovering the remains of an allied Chevrolet truck. Even after all the decades that have passed since the early 1940's the wreckage is in surprisingly good condition. The truck's engine was found half buried in the sand nearby.

image Long Range Desert Group Preservation Society http://www.lrdg.addr.com/images/GssLrdWas1.JPG

click on the image for a high resolution shot.

[Image] What direct hit Sir?

19th September, 1942. El Alamein, Egypt.

Two direct hits on an M3 Grant Tank.

This 8th Army M3 Grant Tank, or General Grant, has taken two direct hits on it's forward armour by German shell fire. These two hits, side by side, have dented the armour but done no real damage. These same hits would have destroyed an English Crusader Tank and likely killed the crew. Whilst far from perfect, the Grant had it over it's English predecessors in the one department that truly mattered, the armour. With much thicker armour, the operational life of the tank, and it's crew, was extended beyond that previously experienced.

The M3 Grant Tank was an interim measure taken by the British after the initial devastating defeats in the Western Desert by the Panzer Divisions. Lacking armour and firepower the British tanks were decimated by the much stronger Germans. After being refused permission to have American factories produce an English designed tank, the British resorted to purchasing the M3 Medium Tank from the United States.

Whilst slow, heavy, with a high profile and with an unusually mounted main gun, the M3 was used extensively in the Western Desert until the M4 Sherman became available. Once the Sherman's arrived in numbers the Grant was rapidly withdrawn from front line operations.

image 025032 Australian War Memorial.

[Image] Invaluable Aussie Advice


22nd July, 1942. Tel el Eisa, Egypt.

Good advice from the AIF?

The cabin door of this 9th Division ammunition truck is painted with either a timely piece of advice or a commentary on life in the Western Desert. In a typical display of Australian defiant humour the men who painted this sign leave it up to the reader to decide their intent.

image 024624 Australian War Memorial.