Saturday, September 6, 2008

[Image] The last men standing at Tobruk

December, 1941. Tobruk, Libya.

The last Australians out of Tobruk.

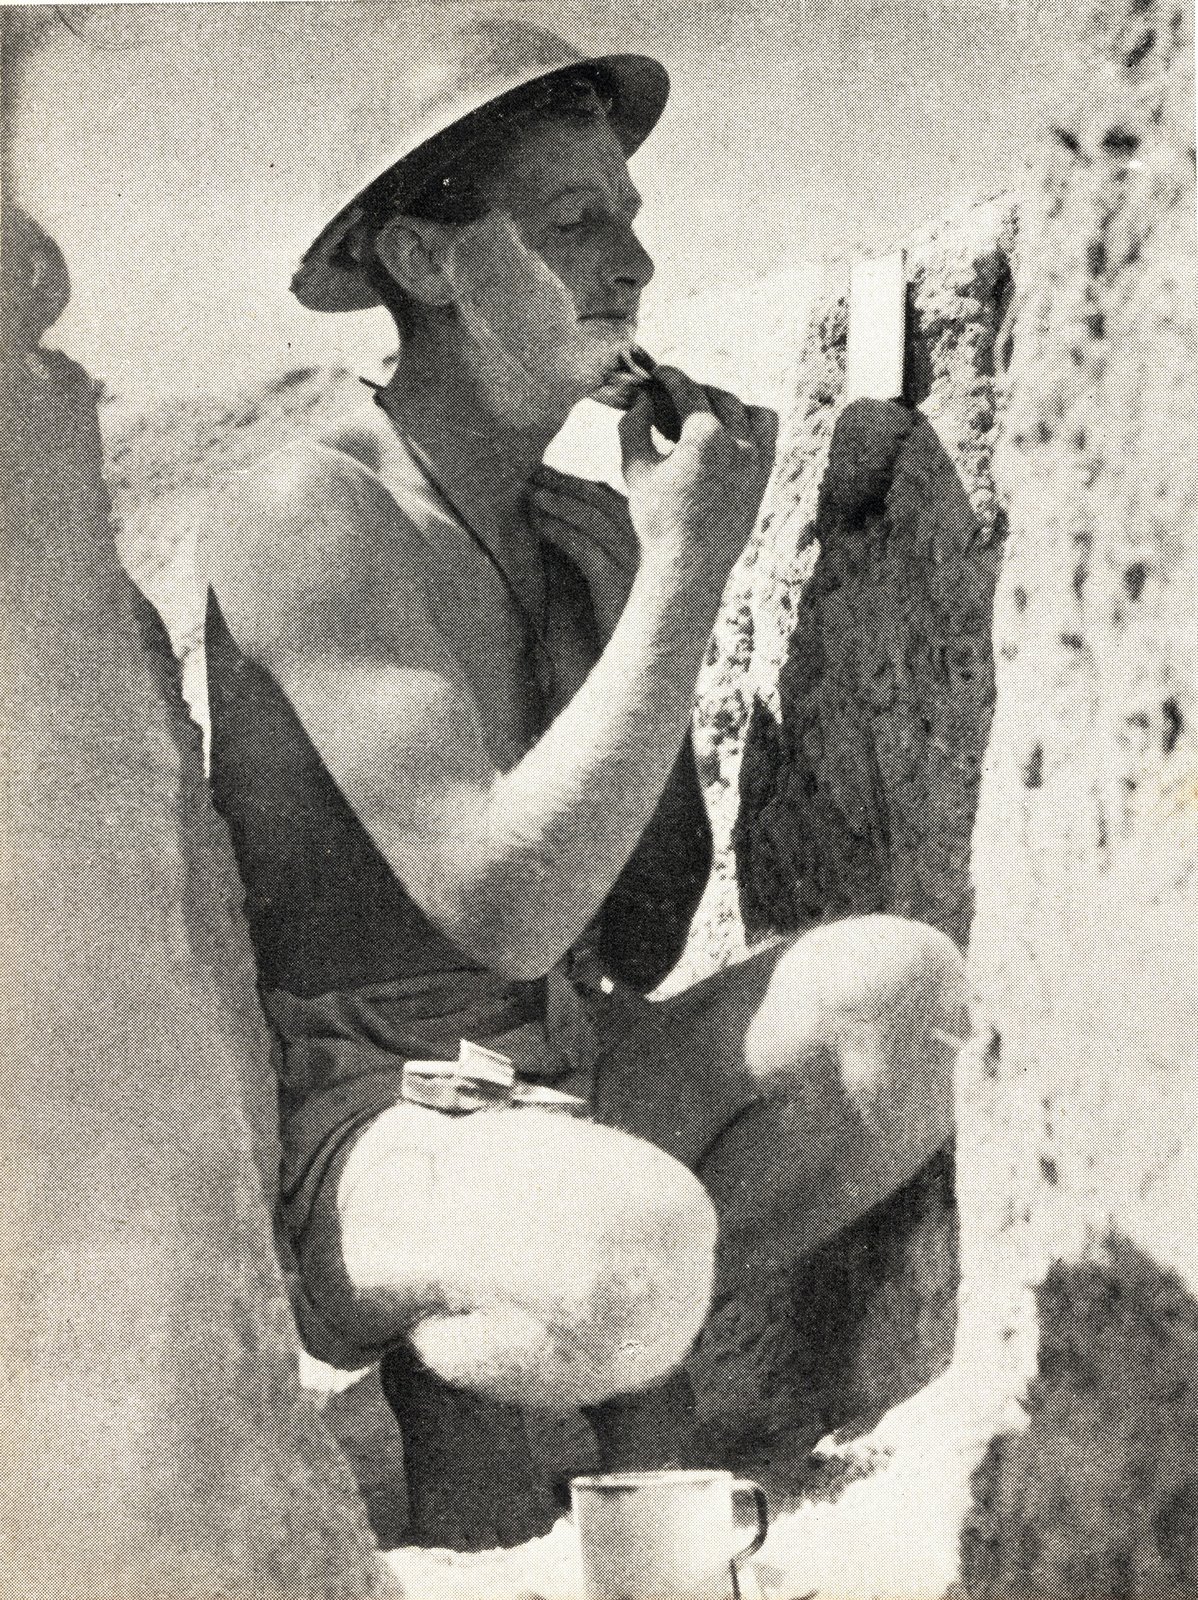
These four men of the 2/13th Infantry Battalion were the last Australians to leave Tobruk. Legendary photographer, Damien Parer, took this shot of the men enjoying a meal. The 2/13th was the only Australian unit to see the Siege of Tobruk through in it's entirety after the Destroyer that was meant to evacuate them in October was sunk 60 miles short of Tobruk.

Not being able to be evacuated by sea the 2/13th fought their way out in the breakout that linked up with the 8th Army and were transported back to Alexandria by truck. Many men were killed and wounded in the breakout action but this was a major success that enabled the Battalion to be finally relieved.

The men in this photo, as taken by Parer, are;

NX36776 Pvt. Leslie E. Everett of Hay, NSW.
NX35738 L. Cpl. Alexander O'Connor of Wagga Wagga, NSW.
NX36799 Cpl. Gabriel Richardson of Yenda, NSW.
NX35348 L. Cpl John W. Cox of Grong Grong, NSW.

All these men survived the war to return home. The sense of relief on their faces belies the fact that worse is yet to come at Alamein in 1942.

image 010979 Australian War Memorial. Negative by Damien Parer.

[Image] Ack Ack Away!

9th October, 1941. Tobruk, Libya.

3.7 inch Anti-Aircraft fire at night.

This amazing photo looks almost like a surreal model. Taken at night, without a flash, using only the illumination of the firing guns. The huge muzzle flashes light the area around for a large area. This means that the gun has to keep firing constantly to ensure that enemy aircraft can't get close enough to get an accurate shot away.

image 020906 Australian War Memorial.

[Image] 2/13th goes through the wire at R27.

8th September, 1941. Tobruk, Libya.

Men of the 2/13th go through the wire.

These two men of the 2/13th are preparing to go through the wire on a small patrol out from post R27 in the Red Line. On the left holding Lee-Enfield .303 rifle with fixed bayonet is NX36511 Sgt. William F. Kubank. To his right is NX36399 Pvt. Stanley C. Hutton with the Thompson submachinegun.

Post R27 in the Red Line is opposite the El-Adem Escarpment, behind which camped the Afrika Korps. The low ground in front of the escarpment was covered extensively by German machine gun posts but these were regularly monitored and dealt with by nocturnal patrols into no-man's land.

image 020784 Australian War Memorial.

[Image] Departing Diggers leave their mark.

20th September, 1941. Tobruk, Libya.

Soon to depart troops leave their mark.

Having been notified that they were to be relieved soon these Diggers decided to leave their marks on a former cafe in Tobruk.

Pictured from left to right are;

SX8509 Pvt. Archibald Lawrence Boyes of the 2/48th.

SX5207 Pvt. Torrence Ford Egan of the 2/48th.

VX40954 Pvt. William Neil Morris of the 2/48th. Pvt. Morris is having a joke by painting his name as "Ned Kelly".

All three men survived the war, especially the carnage of Alamein that was so devastating to the 2/48th Infantry Battalion.

image 020629 Australian War Memorial.

[Image] Relieved Rats arrive in Alex

27th September, 1941. Alexandria, Egypt.

Relieved at last!

These 9th Division veterans of Tobruk manage a smile as they arrive via "bomb alley" to the safety of Alexandria, Egypt. Many of these first men to arrive were wounded and were amongst the priority evacuees.

Evacuated at night by destroyers of the Royal Navy and the Royal Australian Navy these ships would arrive on moonless nights and arrive, unload and take on passengers and cargo and then depart all within the space of half an hour. Once free of the harbour the next 60 miles of coastline was known as "bomb alley" as it was the last stretch of water before Egypt in range of Luftwaffe planes. Zigzagging at high speed to avoid bombers and to break up their wakes these ships were the lifeline of Tobruk Garrison. Everything coming into and going out of Tobruk during the siege travelled via this method.

Whilst the men in this photo have been individually numbered for identification purposes the notation with their names that accompanied it has long since been lost.

image 020470 Australian War Memorial.

[Image] An Incredible Escape Vol. 2

August, 1941. Tobruk, Libya.

A 1,000 pound dud.

These four men of the 9th Division owe their lives to the Czechoslovakian resistance, many members of whom secretly work in Nazi Munitions plants in their occupied country against their will.

This 1,000 pound bomb (453.5 kilograms) contained huge amounts of high explosives but without their detonators they were inert weights. This particular bomb landed 20 feet from the anti-aircraft gun manned by the above Diggers. Amazed to still be alive the men inspected the dud after the attack and found in labeled "Made in Czechoslovakia" in non official markings.

This was not the only dud from Czechoslovakia to arrive at Tobruk during the siege. One memorable one, another 1,000 pounder landed in the town square and failed to detonate. When Engineers arrived to disarm it so it could be removed an examination of where the detonator should have been found a crumpled piece of paper with a handwritten note saying simply;

"From your friends in Czechoslovakia. I am sorry but this is all we can do to help right now".

image 009520 Australian War Memorial.

[Image] Tracers at Twilight.

August, 1941. Tobruk Libya.

9th Division Bren Gunner opens fire at dusk.

With the glow of their illumination lighting their flight path these tracer bullets leave a visible sign of their passage at night as they rapidly pepper the German lines a mere 400 yards away.

This photo was taken during a fierce exchange of machine gun fire between the Aussies and the Germans on the Red Line. Twilight was a preferred time for attacks and counter-attacks as the dying light reduced the effectiveness of both machine guns and artillery. Tracer rounds assisted gunners in aiming their fire at night as they could see the path of their bullets. Problem is so could everyone else.

image 009492/14 Australian War Memorial.

[Image] An Incredible Escape

22nd April, 1941. Tobruk, Libya.

The Benghazi Handicap's Wooden Spooners.

Meet two of the 9th Division's luckiest men. QX1698 Sapper Stanley Curtis and QX2454 Sapper Edward Hetherington-Harford of the 2/7th Field Company, Royal Australian Engineers enjoy a well received cigarette after their late arrival in Tobruk on foot after a 16 day trek.

Left behind in Benghazi to plant demolitions on Italian supply dumps so that the advancing Afrika Korps could not take advantage of them the two Sappers planted explosives to cover the 9th Divisions retreat, known as "the Benghazi Handicap". When surprised by the rapid approach of the advancing Afrika Korp the two men hid and were overtaken by Rommel's Panzer Divisions.

Finding themselves behind enemy lines and surrounded by thousands of Axis troops the men hid by day and travelled by night where possible overland on foot. After a journey of 16 days, and 300 miles (483 kilometres), the men managed to sneak past German positions surrounding Tobruk and return to their units. Immediately hospitalised for treatment of their injuries it is not known if the men played any further part in the Western Desert Campaign. If so I believe they well deserved any rest coming to them after that.

image 041710 Australian War Memorial.

[Image] A Rat in a Hole Vol 2.

September, 1941. Tobruk, Libya.

A very creative doover.

This soldier of the 2/23rd Infantry Battalion takes shelter from the blistering sun of the Libyan desert in his doover improvised by hanging a hammock between the rocks of a sangar built on the side of a small rise.

In the shade, yet open to the breeze on one side the hammock would allow the air to circulate around the Digger and keep him as cool as possible in the situation.

image 020493 Australian War Memorial.

[Image] Rare reprieve for 2/23rd Captain.

June, 1941. Tobruk, Libya.

VX15648 Capt. Edwin P. Tivey takes a rare break.

Capt. Ed Tivey of the 2/23rd Battalion takes a moment of quiet reflection to smoke a cigarette inside the dugout of the Headquarters of the 26th Brigade.

With conditions for officers at HQ areas better than those of the men at the front lines they were hardly luxurious. Often the positions of the HQ areas were plotted by German spotter planes and relayed to the artillery who then would launch a barrage of shells onto the locations. More than one HQ was destroyed by direct hits by the German artillery during the Western Desert Campaign.

Capt. Tivey would have been responsible for 4 platoons of infantry totalling 129 men. It is no wonder that a quiet cigarette in the solitude of his dugout would be a welcome relief from the pressures of command.

Unfortunately research into Capt. Tivey has revealed that he died from illness in Italy on 26th March, 1943. At the time of his death in an Italian POW camp, then promoted Major Tivey was 34 years old. As his service record is yet to be digitised by the National Archives I am unable to ascertain the circumstance behind his capture and transfer to Italy.

Major Edwin Peter Tivey is memorialised at the Roll of Honour here http://www.awm.gov.au/roh/person.asp?p=147-23753

image 020151 Australian War Memorial.

[Image] "The Seat of the Army"

September, 1941. Tobruk, Libya.

The AIF Field Latrine.

This 9th Division Corporal shows off the type of field latrine used by Australian troop in front line positions at Tobruk. With typical Australian humour it was nicknamed "The seat of the Army".

Designed for use on the sandier parts of the desert, the digger would take a small shovel and dig a hole and place the "seat" over it and complete his task. Careful choice of your boghole's position was necessary to avoid detection by snipers and air attack.

image 021003 Australian War Memorial.

[Image] Wounded 2/23rd patrol returns

17th September, 1941. Tobruk, Libya.

2/23rd Patrol returns through the wire.

This patrol from the 2/23rd Battalion returns through a gap in the wire in their Red Line posts. At this time the 2/23rd had just relieved the 2/48th the night before in their positions on the Western salient.

This seven man patrol returns with two wounded. One carried on a collapsible stretcher the other with a bandaged thigh wound is carried by a mate piggy back style. Casualties in this part of Tobruk were high.

image 020669 Australian War Memorial.

[Image] The Water Rat of Tobruk

25th September, 1941. Tobruk, Libya.

Gelignite fishing in the harbour.

This soldier of the 9th Division, identified only as Bill Woodhouse of Wynnum, Queensland, is fed up with the constant rations of bully beef and biscuits and looks to supplement his and his mates rations with a few fish fresh from the Mediterranean caught by throwing sticks of Gelignite into the harbour. The ensuing explosion causing a shock wave in the water that kills the fish allowing them to rise to the surface to be collected by the hungry Diggers.

The fish provided the men with much needed variety of fresh protein that the army rations lacked. It was also a much needed stress relief to have a swim in the ocean.

images 020635 and 020636 Australian War Memorial.

Catch of the day, Tobruk style.

[Image] RAAF foils a Red Line Raid

1941. Tobruk, Libya.

Red Line positions get strafed.

A German Luftwaffe Messerschmitt BF109 Fighter strafes 9th Division front line posts with it's three mounted machine guns raising up clouds of dust and sand as the bullets impact the ground.

Little did this pilot know that his actions were noticed by one of the few Australian RAAF pilots who were still operational in the area who dropped in on him and shot him from the sky to the cheers and applause of the infantry in the Red Line.

I think the above photo is amazing in that it is evidence of the low altitude that the German pilots would drop to in order to have a final parting shot at the entrenched infantry. I have read accounts from members of the 2/17th Infantry Battalion that stated that they were often strafed by fast low flying German's at altitudes as low as 100 feet (approximately 30 metres for the metrically inclined).

They would often have a last parting shot at the infantry after supporting dive bombers on their attack run over the harbour and then follow the El Adem road to the safety of the escarpment and the German lines. If damaged these planes would make an all out last ditch effort to put down beyond the Red Line. Some made it, some didn't. Often the same pilots would strafe the same positions at the same time each day and would make 4 or 5 passes then tip their wings and wave at their intended targets before escaping for another try.

This one was unfortunately caught short by a rare allied fighter. The Luftwaffe certainly had unprecedented air superiority in the Western Desert in 1941. One wonders with 10 German fighters for ever 1 Allied one (at best) if some Luftwaffe pilots would be a little overconfident about their chances.


One less Messerschmitt to worry about.

images 010852 and 010843 Australian War Memorial.

[Image] The long walk to the cage

April, 1941. Tobruk, Libya.

2/48th Captures 70 Italian POW's.

A lone Digger of the 2/48th Infantry Battalion leads a column of Italian POW's on the long walk back from the front lines to the Prisoner of War cage. This was a march of approximately 10 kilometres. With shouldered Lee-Enfield .303 and fixed bayonet he leads the prisoners past the HQ of the 26th Brigade.

It was because of the Italian's general reluctance to fight, and the fact that they felt they would be treated better by the Australians than the Germans, that they willingly surrendered in large numbers. Many captured Italian soldiers possessed a white silk handkerchief and were not afraid to use it. Italian soldiers would often withstand sustained small arms fire from a distance but would crack at the sight of the fixed bayonet up close. Even many of the Afrika Korps chose to spend the rest of the war as a POW than fall victim to an Aussie bayonet. Making this choice is not an act of cowardice.

Many of these Italian prisoners were sent back to Australia and sent to work on farms in rural areas, often later immigrating back after the war to purchase their own farms.

image p02242.018 Australian War Memorial.